How to Test Electromagnetic Relays?
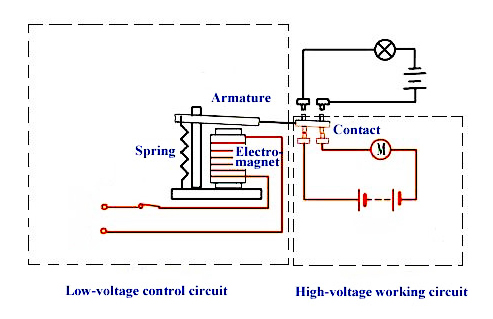
Electromagnetic relay consists of electromagnet, armature, spring, moving contact and static contact. Usually an electromagnetic relay has two circuits, a low-voltage control circuit and a high-voltage working circuit. The low-voltage control circuit includes electromagnetic relay coils, low-voltage power supplies and switches. The high-voltage working circuit includes the contacts of the high-voltage power supply, the motor and the electromagnetic relay.
The working principle of electromagnetic relays is easy to understand. Electromagnetic relays work largely on the principle of electromagnetic induction, which also means that when current is passed through a conductor, the conductor acts like a magnet. So when you turn on the power in the low voltage control circuit, current flows through the coil of the electromagnet and the coil is activated by the power supply system. Therefore, a magnetic field is generated. Here, the armature generates suction to connect the movable and fixed contacts. The power circuit of the motor is turned on and starts working.

Use the following steps to perform quality tests on electromagnetic relays:
- Test the coil resistance: The resistance of the coil is the most important because it is important to the working voltage and working current. Therefore, these two parameters can be calculated from the resistance of the relay coil, which can be tested with mustimeters.
- Test contact resistance: Test the contact resistance, i.e. the resistance of normally closed contacts and movable contacts. How to check - Set the multi-meter to resistance mode for measurement. The resistance mode you get here must be zero. Being zero is considered ideal. An unstable resistance value or a value greater than that indicates that the contacts are in a poor contact condition. An infinite resistance of the normally open contact and the moving contact is generally considered to be a contact sticking. This allows you to distinguish which one is the normally open contact and whether the relay is intact. The method is similar for both new and used relays.
- Test pickup voltage and pickup current: This can be done by connecting a regulated power supply by applying a set of voltages to the relay at the same time. Next, connect an ammeter to the power circuit for monitoring, repeating the process several times to get an accurate answer.
- Test release voltage and release current: These are some of the best ways that electromagnetic relays can be tested. This procedure is similar to the pickup voltage and pickup current test procedures. So when the relay slowly pulls in, slowly reduce the power supply voltage. When you hear the relay release again, write down the voltage and current.
Generally speaking, the release voltage of the relay is 10-50% of the pull-in voltage. If the release voltage is too low, it will negatively affect the operation of the relay. The relay will not function properly. Ultimately, the stability of the circuit is degraded, and the reliability of operation can be easily affected.
Once the electromagnetic relay testing process is complete, selecting a reputable brand is crucial for ensuring the safety and efficiency of your circuits. By choosing electromagnetic relays from ATO manufacturers, you can be confident that you will receive accurate and stable circuit control, as well as industry-leading technical support and customer service.
